keycloak js adapter 를 쓰면서 알게 된 내용을 정리해보자
(수정사항이나 피드백 환영합니다.)
ResponseMode 지정
-
keycloak instance 를 init 을 이용해 초기화 할 때, responseMode 을 fragement or query 로 지정해 줄 수 있다.
-
fragement 가 default 다.
-
fragment 로 해놓을 경우 뒤에 # 이 붙은 fragment 형태로 param 이 붙어서 온다.
(fragment 로 붙어 있는 인자들은 http request 로 보내지지 않는다.)
1) fragment 로 할 경우
2) query 로 해놓을 경우
keycloak js adapter 의 typescript 용 keycloak.d.ts 에서 responseMode 값에 주석 내용을 보면 fragment 를 권장하고 있다.
/**
         * Set the OpenID Connect response mode to send to Keycloak upon login.
         * @default fragment After successful authentication Keycloak will redirect
         *                   to JavaScript application with OpenID Connect parameters
         *                   added in URL fragment. This is generally safer and
         *                   recommended over query.
         */
response mode 에 따른 redirect uri 파싱
redirect uri 에 담겨온 파라미터를 어떻게 파싱하는 걸까
keycloack.js 코드를 보면 url 을 파싱하는 함수가 있다.
function parseCallbackUrl(url) {

// 생략. 많은 코드들이 있어요


   var queryIndex = url.indexOf('?');
   var fragmentIndex = url.indexOf('#');

   var newUrl;
   var parsed;

   if (kc.responseMode === 'query' && queryIndex !== -1) {
      newUrl = url.substring(0, queryIndex);
      parsed = parseCallbackParams(url.substring(queryIndex + 1, fragmentIndex !== -1 ? fragmentIndex : url.length), supportedParams);
      if (parsed.paramsString !== '') {
          newUrl += '?' + parsed.paramsString;
       }
       if (fragmentIndex !== -1) {
           newUrl += url.substring(fragmentIndex);
        }
    } else if (kc.responseMode === 'fragment' && fragmentIndex !== -1) {
         newUrl = url.substring(0, fragmentIndex);
         parsed = parseCallbackParams(url.substring(fragmentIndex + 1), supportedParams);
         if (parsed.paramsString !== '') {
              newUrl += '#' + parsed.paramsString;
          }
      }

     if (parsed && parsed.oauthParams) {
         if (kc.flow === 'standard' || kc.flow === 'hybrid') {
             if ((parsed.oauthParams.code || parsed.oauthParams.error) && parsed.oauthParams.state) {
                  parsed.oauthParams.newUrl = newUrl;
                  return parsed.oauthParams;
             }
        } else if (kc.flow === 'implicit') {
            if ((parsed.oauthParams.access_token || parsed.oauthParams.error) && parsed.oauthParams.state) {
                 parsed.oauthParams.newUrl = newUrl;
                 return parsed.oauthParams;
            }
        }
      }
    }
parseCallbackUrl 함수를 요약하자면
1) responseMode 가 fragment, query 인지에 따라 parameter 를 파싱 한다.
2) keycloack flow가 standard (authorization code 방식인 듯 하다.) or hyprid 인지 standard 인지에 따라
파싱한 파라미터를 확인한다.
3) authorization code 일 경우에는 code 를, implicit 일 경우에는 acess_token 을 받아왔는지 보고있다.
Authorization Code 와 Access Token 교환
- 해당 작업은 keycloak flow 가 implicit 가 아닐때만 일어난다.
keycloack.js 에서 processCallback 함수가 이 작업을 해주는 듯 하다.
첫번째 인자로는 parseCallback 의 return 값이 들어간다.
parseCallback 은 redirect_uri 에서 들어온 정보들을 파싱해서 넘겨준다. 여기에 code 정보가 들어있다.
function processCallback(oauth, promise) {
            var code = oauth.code;
            var error = oauth.error;
            var prompt = oauth.prompt;

            var timeLocal = new Date().getTime();
            // 생략 ...

            // implicit 모드가 아니고 code 가 있을 경우에 access token 을 교환하기 위한 request 를 만든다.
            if ((kc.flow != 'implicit') && code) {
                var params = 'code=' + code + '&grant_type=authorization_code';
                var url = kc.endpoints.token();

                var req = new XMLHttpRequest();
                req.open('POST', url, true);
                req.setRequestHeader('Content-type', 'application/x-www-form-urlencoded');

                params += '&client_id=' + encodeURIComponent(kc.clientId);
                params += '&redirect_uri=' + oauth.redirectUri;

                if (oauth.pkceCodeVerifier) {
                    params += '&code_verifier=' + oauth.pkceCodeVerifier;
                }

                req.withCredentials = true; //withCredential 을 true 로 설정한다.

                req.onreadystatechange = function() { //응답이 왔을 때의 callback 함수 동작
                    if (req.readyState == 4) {
                        if (req.status == 200) {

                            var tokenResponse = JSON.parse(req.responseText);
                            authSuccess(tokenResponse['access_token'], tokenResponse['refresh_token'], tokenResponse['id_token'], kc.flow === 'standard');
                            scheduleCheckIframe();
                        } else {
                            kc.onAuthError && kc.onAuthError();
                            promise && promise.setError();
                        }
                    }
                };

                req.send(params);
            }
Keycloak-js 의 acess token 교환 방식
보통 Authorization Code 방식이라 하면, authorization code 와 미리 발급받은 client sercet 을 가지고, 자신이 client 임을 인증하고,
access token 을 발급 받는다.
그러나 위 과정을 보면 client secret 을 acess token 교환시 같이 주지 않는다.
심지어 client type 도 public 이라 client secret 도 없는 상태다.
이를 자세히 보기 위해서는 client type 부터 알 필요가 있다.
Client Type
Oauth2.0 에서는 client type 을 confidential 과 public 두 가지로 정의한다.
https://oauth.net/2/client-types/
https://auth0.com/docs/applications/confidential-and-public-applications#grant-types
Confidential type
- authorization server에 안전하게 인증할 수 있는 application 이다.
- 예를 들어, 등록된 sercret 을 안전하게 유지할 수 있어야 한다.
- secret 을 저장 할 수 있는 신뢰가능한 백엔드 서버가 필요하다.
Grant Type
다음과 같은 것들이 confidential application 으로 간주된다.
- Authorization Code Flow 를 사용하는 안전한 backent 가 있는 web applications
- Resource Owner Password Flow
- Resource Owner Password Flow with realm support
- A machine-to-machine (M2M) application that uses the Client Credentials Flow
Public type
등록된 client secret 을 사용할 수 없다. 브라우저나 mobile device 에서 실행되는 application 들이 있다.
Grant Type
client secret 을 요구하지 않는 grant type 만 사용 할 수 있다.
다음과 같은 것들이 public application 으로 간주된다.
- Authorization Code Flow with PKCE 를 사용하는 native desktop 이나 mobile application
- Implicit Flow grant 를 사용하는 client side 웹 application (singe-page app 같은)
Authorization Code + PKCE
keycloak-js 는 client 가 public type 이다. (secret 이 없다.)
그러나 authorization code 를 acess token 과 교환하기 때문에 impicit flow 는 아니다.
위 public client type 에서 말한 Authorization Code Flow with PKCE 가 keycloak-js 가 쓰는 방식으로 보인다.
정정한다. keycloak init 옵션에서 pkceMethod 를 지정할 수 있는데, 해당 method 를 지정하지 않으면 pkce 는 쓰이지 않는것으로 보인다.
실제 processCallback 코드를 보면 pkce 를 param 으로 넣어주는 부분이 있다.
if (oauth.pkceCodeVerifier) {
   params += '&code_verifier=' + oauth.pkceCodeVerifier;
}
PKCE (Proof Key for Code Exchange)
auth0.com/docs/flows/authorization-code-flow-with-proof-key-for-code-exchange-pkce
Auth0 Docs
Get started using Auth0. Implement authentication for any kind of application in minutes.
auth0.com
PKCE 는 public client 에서도 사용 할 수 있도록 standard code flow (authorization code) 에 추가 된 것이다.
Code Verifier와 Code Challenge 가 추가 된다.
- code verifier : 48~128 글자수 가진 random string
- code challenge : 선택한 hash 알고리즘으로 code_verifier 를 hasing 한 후 base 64 로 인코딩 한 값
다음과 같은 과정을 거친다고 한다.
- authorization server 에 client_id & redirect_uri 넘겨줄 때 code_challenge 와 hash 함수 종류를 넘겨준다.
- authorization server 에 code 전달 할때,code_verifier 를 같이 넘긴다.
- authorization server는 code_challenge 와 전달받은 code_verifier를 해싱 + base64 인코딩해서 비교한다.
- 검증이 완료 되면 access token 을 넘겨준다.
keycloak-js 에서 pkce 사용
- 먼저 client 에 pkce 사용을 지정해준다.
keycloak admin console 에서 지정해줄 수 있다.
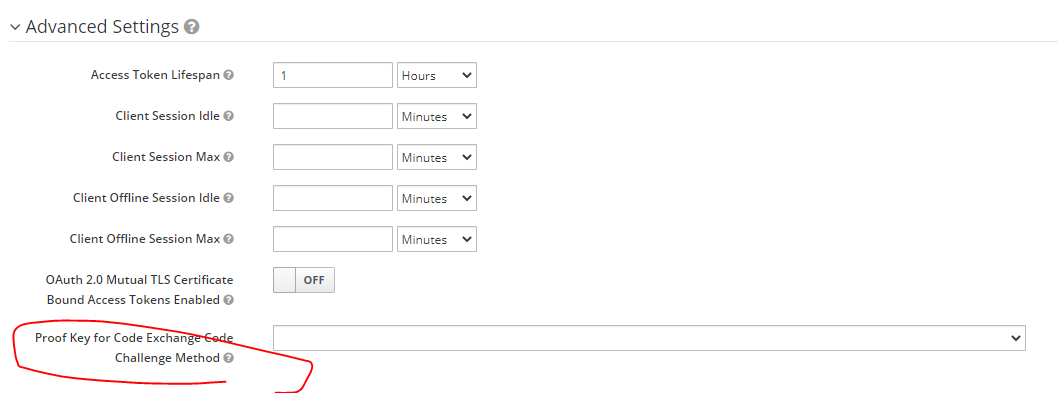
-
init 함수에서 pkce method 를 지정해준다.
1번만 설정한 상태로 client_id 전달시에, code challenge 가 오지 않았다는 에러가 뜬다.this.keycloak_ .init({ // 기타 개인 설정들 pkceMethod: 'S256', })
실제 서버 요청시 url
-
pkce mode off , fragment mode on 인 경우 client_id, redirect_uri 등 전해줄 때
keycloak 로그인 페이지에 전달된 url 이다https://[ip]/openid-connect/auth? client_id=[clinet_id]& redirect_uri=[redirect_rui]& state=[정체모를 string]& response_mode=fragment& response_type=code& scope=openid& nonce=[정체모를 string]
'기타 > Keycloak' 카테고리의 다른 글
| react-keycloak, js-adapter (0) | 2021.03.25 |
|---|
